so are you ready to crochet ?
lets get started with the basics !
(Now, If you already know how to crochet and want to see some cool vids on how to make cool stuff like Magic Rings, etc, scroll all the way down)
Lesson 1: Chain stitch (ch)
lets get started with the basics !
(Now, If you already know how to crochet and want to see some cool vids on how to make cool stuff like Magic Rings, etc, scroll all the way down)
Lesson 1: Chain stitch (ch)
1. Chain stitches are an integral part of crocheting. There are several essential stitches that a beginner must become familiar with; the chain stitch is the first of these.
2. You can expect to begin most crochet projects with chain stitches. Chain stitches typically form the foundation that the rest of the project is built upon...like when you're making a dishcloth, scarf, or potholder. SO...below: This would be like the first row....
 |
| this is a chain row or foundation row, first row of a project |
.
HOW TO DO IT :
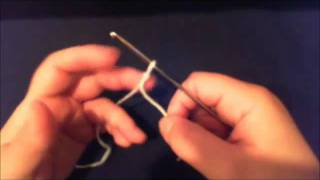
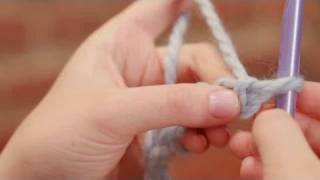
Hold the slip knot (sl) SHOWN BELOW; between your thumb and fore (first) finger on the left hand. see below. Move the hook under and over the yarn, with the yarn held in the hook. Pull the hook and the yarn back through the slip knot to form the first chain stitch. Keep going until you have the number of chains stated in your pattern. When counting stitches, do not count the stitch on the hook.
now this "chain" can become the foundation for a scarf!
********************************************************************
but first you must know.....

see how the yarn on left is OVER the hook as she draws it thru loop?
Again...this is the very first stitch you will make as you begin any crochet pattern
 she has now yarned over her hook, and THRU the knot or stitch....
which is also referred to as 1 chain stitch or the 1st chain stitch in your foundation or chain row! Now keep making more chain stitches and you'll have a chain row as shown in video above.
Another way to look at it......

end of the yarn (on left)...on right is the rest of the skein of yarn and the yarn you work with

VIDEO SHOWING HOW TO SLIP KNOT and START CHAIN ROW:
Lesson 3: next basic beginning stitch is:
SINGLE CROCHET
here's a video on how to make a row of single crochets:
~~~~~~~~~~~~~~~~~~~~~~~~~~~~~~~~~~~~~~~~~~~~~~~~~~~~~~~~~~~
FOR THOSE OF YOU WHO ALREADY CROCHET!
used for starting balls, spheres, heads, anything which has a round shape....


click this link:
how to crochet a "MAGIC RING"
********************************************************************
but first you must know.....
Lesson 2: Slip stitch or slip knot (sl st)
see video below....
this is the very first stitch of ANY crochet project!
see video below....
this is the very first stitch of ANY crochet project!

wrap the yarn around your hook and draw it through...
called Yarn Over (yo)
Again...this is the very first stitch you will make as you begin any crochet pattern

which is also referred to as 1 chain stitch or the 1st chain stitch in your foundation or chain row! Now keep making more chain stitches and you'll have a chain row as shown in video above.
Another way to look at it......
end of the yarn (on left)...on right is the rest of the skein of yarn and the yarn you work with
THEN...
insert the crochet hook down through the loop and hook the yarn. This is called "yarn over" because you are putting the yarn "over" your hook then pulling thru loop....
Pull the long end through the loop and tighten.
VIDEO SHOWING HOW TO SLIP KNOT and START CHAIN ROW:
Lesson 3: next basic beginning stitch is:
SINGLE CROCHET
 | |||
| here we have a chain, like we saw above in video, to which single crochet stitches are starting to be added |
 | |
| here, we have 3 rows of single crochet stitches, and now it has become a potholder, scarf or dishcloth |
here's a video on how to make a row of single crochets:
QUESTIONS ??
contact me ! ~~~~~~~~~~~~~~~~~~~~~~~~~~~~~~~~~~~~~~~~~~~~~~~~~~~~~~~~~~~
FOR THOSE OF YOU WHO ALREADY CROCHET!
used for starting balls, spheres, heads, anything which has a round shape....
 |
| here, after ring is done, you hole close it up by pulling on yarn |
click this link:
how to crochet a "MAGIC RING"
 |
| just showing steps to start the ring/circle, thru completion, the yarn on left was pulled to close the hole |